This is an old revision of the document!
Installing the hardware
Before mounting the unit, please remember to register it online. The registration code is on the side label, and may be difficult to access after the unit has been installed.
 The ezeio can be installed inside a larger enclosure, or used by itself mounted on a flat surface or DIN track.
The ezeio is designed for mounting on a standard 35mm DIN track. Simply snap the unit in place. There is a release tab that can be easily accessed by pulling our the green screw terminals. Pull the tab down to release the unit from the DIN track.
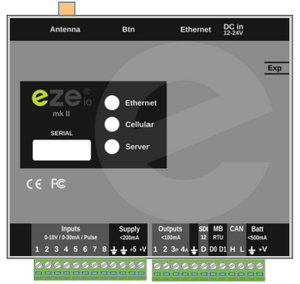
There are no restrictions on orientation, but for the purposes of this document we will refer to 'up' as the side where the antenna and Ethernet connectors are, and 'down' as the side where the green screw terminals are. The ezeio has no mechanical moving parts, and does not generate any significant heat.
The three LED's on the front communicate valuable information about the communication status. Please make sure the LED's are easily visible for the user. For information on the LED indication see Indicators
Required space
The ezeio unit measures 107mm x 90mm x 33mm without terminals and connectors. We recommend allowing at least 50mm for connectors and wires on the top and bottom.
Expansion modules, if used, will connect on the right side of the unit, so plan for leaving open space as needed.
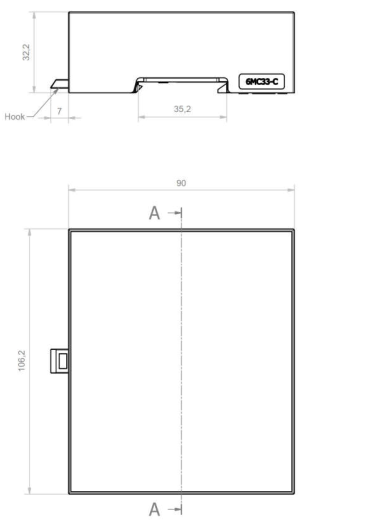
Download STEP drawing.
Screw mounting
If you are not using DIN rail, the ezeio can be mounted using two screws and the keyholes on the back. The screws need to be 74.35mm (2930 thou) center-to-center.
When using the ezeio with side-dock expansion modules, always use a DIN rail. Do not use screw mount with side-dock modules.
Antenna
Use only the antenna supplied with the ezeio. The antenna and antenna mounting bracket has excellent performance when mounted correctly. Please follow these instructions.
The antenna bracket can be mounted on a horizontal or vertical surface using two regular screws, or on a pole using a U-bracket. Make sure the bracket is mounted horizontally and the antenna pointing straight up.
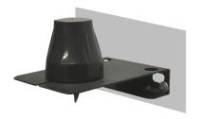
After mounting the antenna bracket, position the antenna on the bracket, and tighten the nut.
Wiring
The green screw terminals can be pulled out from the body of the ezeio to make access and wiring easier. Make sure you open the screw terminals properly before inserting the wire. Avoid running multiple wires into the same terminal. If you need multiple wires to connect to the same terminal, for example if you have a lot of ground connections, use an external terminal solution. Do not tighten the screws too hard, and check each wire by pulling it gently to make sure it has a good connection.
The antenna connector shall be finger tight. Do not use a wrench. Make sure the antenna connector is free of dirt or water before connecting.
The Ethernet connector is a standard RJ45 network connector. There should be a solid 'click' when the plug is inserted. To release, press the tab and pull gently.
Do not use force on any of the connectors. With the exception of a small flat-head screw driver for the screw terminals, no tools are required to connect/disconnect the wires.